Grid Features
Features Common to All Data Grids
Each grid in Calibration Control (our Calibration Management Software) shares the same interface and basic features. Navigate data with sorting options, filters, grouping, and more.
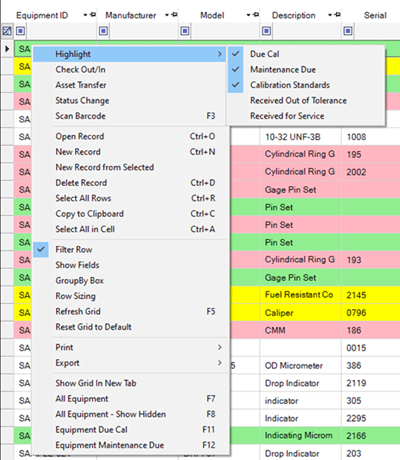
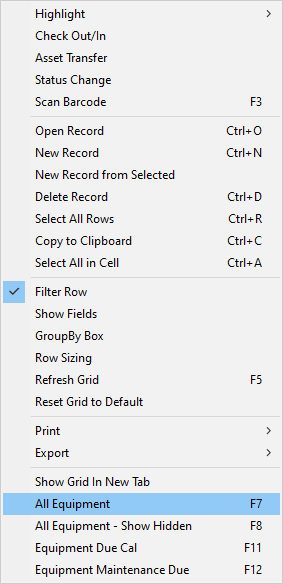
Context Menu: Find more options by right-clicking anywhere in a grid for the context menu. Selections may vary by grid.
-
Alternate Grid Views: Most Data Grids have additional context menu items located at the bottom of the menu. Commonly, these additional menu items will be alternate views of that data grid. For example, the Equipment Data grid has 4 additional menu items: All Equipment, All Equipment - Show Hidden, Equipment Due Cal and Equipment Maintenance Due which also can be accessed by pushing the corresponding key (e.g. F7).
- Export: Right-click in the grid and in the context menu, select the option to Export to either Excel or PDF.
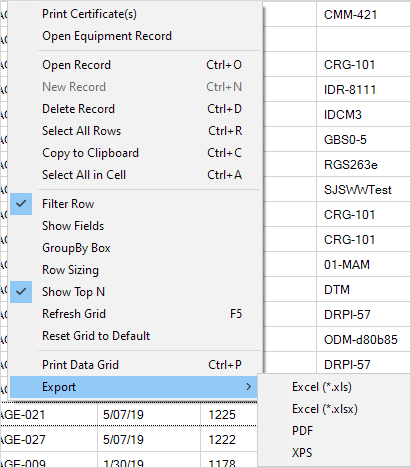
- Change Font Size: Change the grid's font size by clicking on the 'Row Sizing' option and entering the size value in the Font Size box. The default font size shows 0, but is actually equal to 8, and numbers larger than 8 will yield larger font sizes.
Column Change: Drag any column header to change its placement on the grid. Alternatively, use the small down arrow next to each header to select which column you want changed to that space.
Context Sort: Click directly on a column header to sort records in ascending or descending order for that column. Hold the shift key while clicking on additional column headers to create sorts with multiple columns.
Refresh: Refresh the data by pressing [F5] or by right-clicking the grid and selecting Refresh Grid from the context menu.
Add New: Create a new record by double-clicking in the gray area of the grid, pressing [Ctrl+N], or by right-clicking the grid and selecting New Record from the context menu.
Open and Edit: Open a record by first selecting the record and then double-clicking, pressing [Ctrl+O], or by right-clicking a record and selecting Open Record from the context menu.
Delete: Delete a record by first selecting the record and then pressing [Ctrl+D] or by right-clicking the selected record and selecting Delete Record from the context menu.
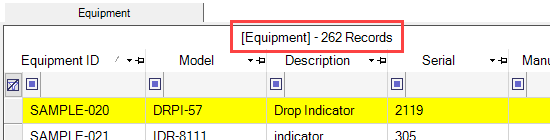
Display Count: Displays how many records are listed. In the Equipment grid, the count for Equipment Past Due will also be displayed.
- Records: The number of records contained within the grid is indicated in the Grid Header.
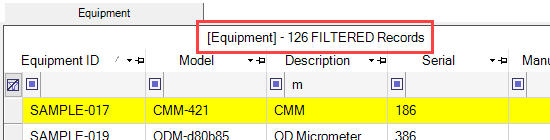
- Filtered: The number of filtered records is also indicated within the Grid Header.
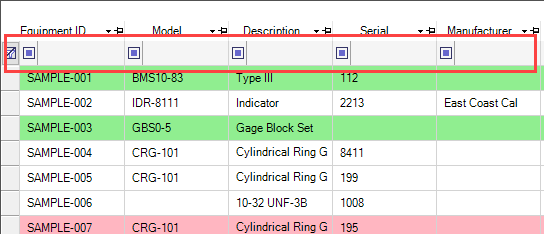
Filter Row: The Filter Row is a helpful tool for searching and reorganizing data.
- When the Filter Row is enabled from the context menu, a blank row will appear at the top of each column.
- Filters can be added to multiple columns at the same time.
- Create custom (i.e., combination) filters within a single column by selecting 'Custom' from the drop-down menu.
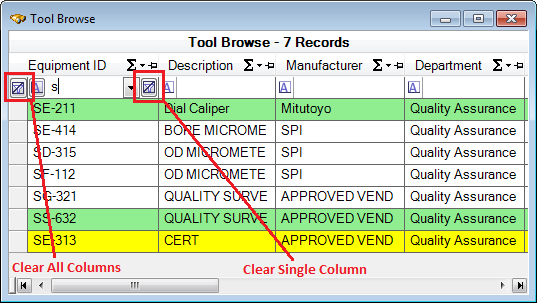
Clear Filters: Clear a single column filter by placing the cursor in the filter field for that column and pressing the clear filter button (looks like a crossed out filter). Clear all filters by selecting the clear filter button at the far left of the filter row.
Pinned Sort Column: Click the Pinned Sort button (looks like a thumb tac) located at the top right corner of the column header and the selected column will be "pinned" to the left hand side of the grid. When horizontally scrolling through a grid, a pinned column will stay visible.
Grid Splitter: Use the Grid Splitter to view multiple sections of the grid at the same time by dragging the Grid Splitter bar to the desired height of the grid. And the grid can be split as many times as needed. Remove a Grid Splitter by dragging the bar all the way to the top or bottom of the grid.
Show Fields: Add and remove columns (i.e., fields) by right-clicking and selecting Show Fields from the context menu.
- Check the desired field columns to [Add] from available fields or [Remove] from visible fields.
- Also, change the column order by selecting a visible field and clicking the [Move Up] or [Move Down] buttons.
Grouping Data: The GroupBy Box view is great for on-the-fly organization with “mini-data sets”, giving you the ability to arrange records by their columns.
- When the GroupBy Box mode is enabled from the context menu, a gray 'Drag To' section (the GroupBy Box area) appears at the top of the grid.
- Select and drag column headers (fields) into the gray area to create custom groupings.
- Remove any fields from the header by simply dragging them up and out of the gray boxed area and releasing.
- And if desired, the GroupBy mode can be disabled with records still organized in custom groupings.