Calibration Events
In Calibration Control (our Calibration Management Software), you can record all equipment calibration history data — from a third-party calibration company with a calibration certificate — to an in-house technican and all the measurement data.
Equipment Calibrations
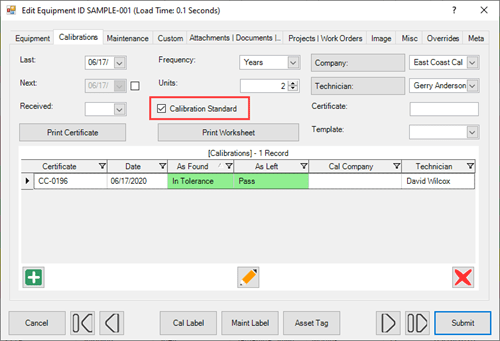
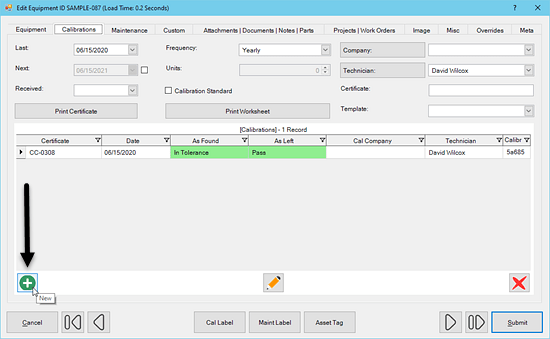
From an open Equipment record, view the Calibrations tab of the Edit Equipment dialog for a summary and any historical calibration records created for that piece of equipment. Each historical calibration record can be opened, viewed again, and linked for traceability if it is not yet approved and locked.
Create a Simple Calibration Event
To create or add a new record of a Calibration Event, either click the green [+] icon or right-click within the calibrations records gray area) for the context menu and select to add "New Record" (Ctrl+N). The following image is a simple Calibration Event without Measurements, as is often the case when recording calibrations handled by an external calibration laboratory.
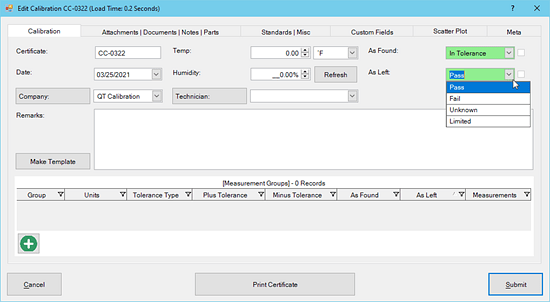
The Calibration Results (As Found and As Left) can be selected when no Measurement Groups exist. The Technician, Temperature, and Humidity fields are usually not required in the outside lab scenario because this data would be included on the certificate the external organization provided. The calibration certificate provided by the outside calibration company can then be attached to this Calibration Event.
Calibration Event Fields
- Certificate: A sequential number is assigned to each Calibration. This number is automatically used as the Certificate number, unless another value is entered in this field, and it should be unique. (To set the number value to automatically increment for this field, see the Number Masks help topic for more information.)
- Date: Date the Calibration Event took place. This field defaults to today's date.
- Company: The organization that calibrated the equipment, like your own company (Internal) or a calibration laboratory (External).
- Temp (Temperature): Enter the ambient temperature of the room where the calibration is performed. If a THUM device (USB hygrometer) is plugged in and configured this field will auto populate.
- Humidity: Enter the Relative Humidity of the room where the calibration is performed. This field is also auto populated with a configured THUM device.
- Technician: The individual who performed the calibration. This field is auto populated from the Technician field on the parent Equipment record.
- As Found: Record the condition of the equipment when it was received for calibration (e.g., Out of Tolerance or In Tolerance). This field gets auto-populated when the results are tied to the results of the Measurement Groups.
- As Left: Record the condition of the equipment at the end of the Calibration Event. This field is auto-populated when using Measurement Groups because the results of the groups are tied to the overall result of the Calibration Event.
- Remarks: Use this field for any remarks related to the Calibration Event.
- Refer to Measurement Groups section.
Attachments|Documents|Notes|Parts Tab
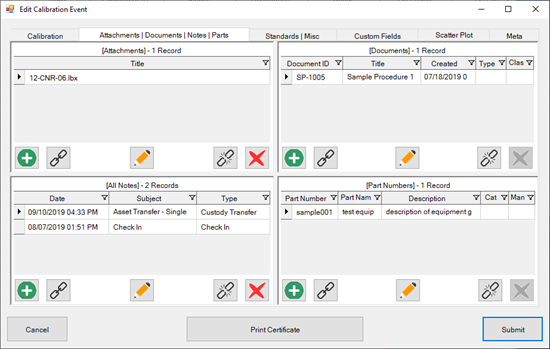
This panel grid contains the Attachments, Documents, All Notes, and Part Numbers grids. Use the Add, Link, Edit, Unlink, and Delete buttons at the bottom of each panel grid to edit the information. Resize the panel grids by clicking and dragging the spacer bars.
- Attachments: Attach a certificate PDF provided by an external calibration company, a cal worksheet, or link other existing Attachments to this calibration record.
- Documents: Attach your Procedures to this calibration event, if it is not already linked to the Equipment record.
- Notes: Link other existing Note records to this calibration or add a new Note.
- Part Numbers: Link more information from Part Number records to this calibration.
Standards|Misc. Tab
Calibration Standards can be tied to a calibration event in three tiers of traceability for the test/master gages used. You can select Standards at the Calibration record level, the Measurement Group level, and/or at the Nominal level.
This tab allows you to identify the Standards used in the overall Calibration event level.
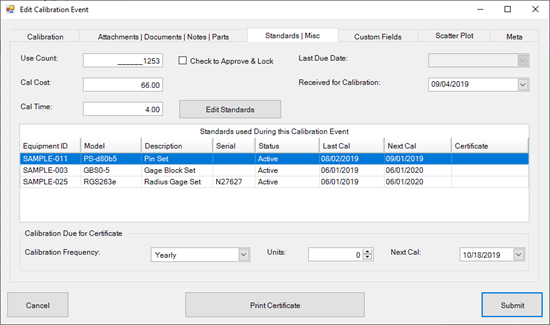
Miscellaneous information related to the Cal Event is also available in this tab:
- Use Count: Shows how many times the equipment being calibrated has been used since its last calibration.
- Approval: Checking the box in this tab approves and locks the current Calibration Event record from future editing. If the current user is signed-in at the time the box is checked, that Person's name will be tied to the approval of the Event and the name and date is signed on the Calibration Certificate stock report.
- Cal Cost: The actual cost of this Calibration Event.
- Cal Time: The actual time required to perform this Calibration Event.
- Last Due Date: This is the most recent Equipment Due for Calibration date, before this current event.
- Received for Calibration: Choose the date the equipment was received for calibration. This field auto-populates with the Equipment's Received for Calibration date if your setting is defined in Options with the Status Change feature.
- Recently added: Watch a video about the new ability for Mass Approval of Calibration Records
Calibration Due for Certificate
At the bottom of the Standards | Misc tab are more values specifically for the Calibration Certificate.
- Calibration Frequency: Choose the frequency of calibration, if this field does not auto-populate from the Equipment record. This displays on the Calibration Certificate stock report.
- Units: Choose the appropriate Frequency Units, if this field does not auto-populate from the Equipment record. This displays on the Calibration Certificate stock report.
- Next Cal: Select the date of the equipment's next calibration, if this field does not auto-populate from the Equipment record. This displays on the Calibration Certificate stock report.
Measurement Groups: Structure and Fields
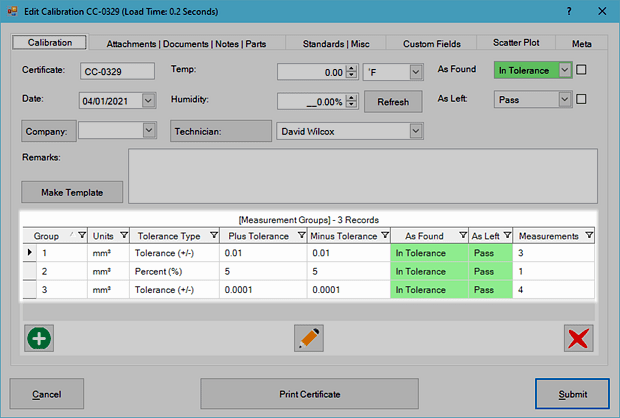
- Each Calibration Event can have several Measurement Groups or none at all.
- Each Measurement Group can have any number of Nominal Measurements in it.
- Each Measurement Group can have its own Tolerance, Unit of Measure, and Equipment Standards Used in Calibration.
-
To illustrate, the diagram below is a single Calibration Event with three Measurement
Groups with a different number of nominals in each Measurement Group.
Measurement Group Fields
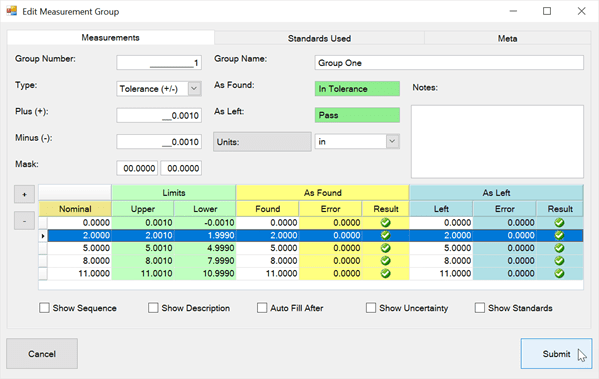
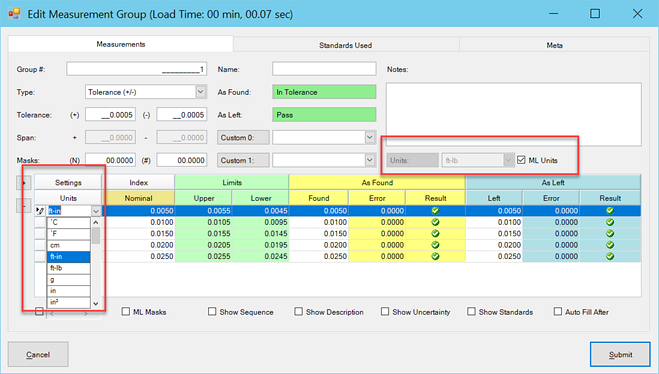
From the Calibration tab in the Edit Calibration dialog, use the bottom panel grid [ + ] icon to add a Measurement Group(s) to the Calibration Event. Below are defined fields in the Measurements tab of the Measurement Group dialog:
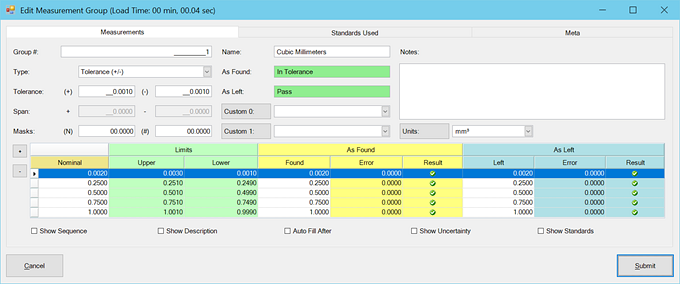
- Group #: Measurement Group Number auto-populates; change the number, if needed.
-
Type: Set the Tolerance Type as None, Nominal Percent (%), Span Percent (%), Tolerance (+/-), Manual Entry, or Locked.
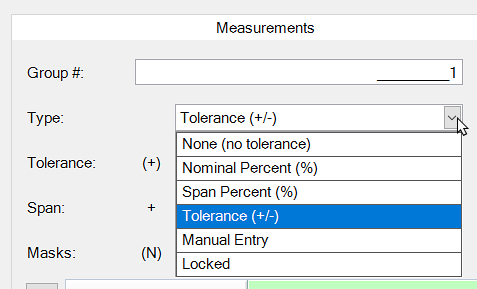
The chosen Type applies to all measurements of this group. (Alternatively, check the ML Tolerance checkbox; see further down). The following is the result of each available Tolerance Type:
- None: The Upper and Lower Limits are the same as the Nominal.
- Nominal Percent (%): [Upper Limit = Nominal + (Nominal x Plus Tolerance)] and [Lower Limit = Nominal - (Nominal x Minus Tolerance)]
- Span Percent (%): {Upper Limit = Nominal + [(Upper Span - Lower Span) x Plus Tolerance]} and {Lower Limit = Nominal - [(Upper Span - Lower Span) x Minus Tolerance]}
- Tolerance (+/-): [Upper Limit = Nominal + Plus Tolerance] and [Lower Limit = Nominal = Minus Tolerance]
- Manual Entry: Manually enter the Tolerance values.
- Locked: Once Tolerance and plus/minus values are set, select to Lock the Tolerance Type to prevent editing of the upper and lower limits.
- Tolerance Plus (+) and Minus (-): Enter upper and lower limits when using 'Nominal Percent' or 'Tolerance' as the Tolerance Type. Then set the Type to 'Locked' to avoid changes.
- Span Plus + and Minus -: Choose upper and lower span ranges when using 'Span Percent' Tolerance Type. Then set the Tolerance Type to 'Locked' to avoid changes.
- Masks: The Number Mask is used to set the Integer Spaces (number places to left of decimal) and Significant Digits (number places to right of the decimal). The first mask field controls only the Nominal Mask. The second mask field controls the general mask for all values other than the nominal. (Alternatively, select ML Masks checkbox as described further down.)
- Group Name: Enter a group name for the Measurement, if desired.
- As Found: Automatically In Tolerance (green) or Out of Tolerance (pink) dependent on the value of the As Found Result column in the Measurement Grid below (yellow area). If any record has a failing result (red X), the Measurement Group As Found value will be Out of Tolerance.
- As Left: Automatically Pass (green) or Fail (pink) dependent on the value of the As Left Result field in the Measurement Grid below (blue area). If any record has a failing result (red X), the Measurement Group As Left value will be Fail.
- Measurement Notes: Add any notes specific to the current Measurement Group.
- Custom 0 and Custom 1: Two customizable combo-boxes to rename as needed for your organization's use and purposes. Click directly on the field name to quickly add values to the drop-down lists. Visit the Change Field Names help topic to learn how to rename fields.
-
Units: Select the Unit of Measurement to apply to the measurements in the current Measurement Group.
- Tip: Edit Measurement Units to make them unhidden from the combo-box drop-down list
by going into the Codes grid group for measurement units. Alternatively, add a new Measurement Unit in the open Measurement Group by clicking directly on the Meas Units field name (combo-box).
Additional Checkbox Features
- ML Unit: Check the [ML Units] checkbox to identify measurement units at the Measurement Level instead of the Measurement Group.
- ML Tolerances, Masks, & Units: Watch a video about multiple tolerances, masks, and/or units at the Measurement Level in a Measurement Group.
- Show Sequence: Check the box to enter a custom sequence order for each measurement.
- Show Description: Check the box to enter a custom description for each measurement.
- Show Standards: (Standards Used for Nominals) Check the box to tie standards to each measurement. Double-click in the Other column / Stds field for 'Edit Standards' to select from the available standard equipment records.
- Auto Fill After: Check the box to copy the same measurement results from the 'As Found' column to auto-fill the 'As Left' column.
- Show Uncertainty: Check the box to enter Measurement Uncertainty values to the results. Double-click the 'Other' column that appears and enter "Expanded Uncertainty" and/or select an existing Uncertainty Study from the combo-box.
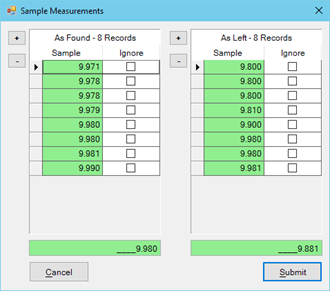
- (Hidden) Sample Measurements: To display, double-click in the 'As Found' or 'As Left' columns to enable Sample Measurements. Enter any range of sample measurements to apply its average in the 'As Found' or 'As Left' fields.
Standards Used in Measurement Group
Linking Calibration Standards in the Measurement Group is the most popular user method of traceability for Calibration Events. Note: You have the ability to link Standards at (a) the upper-level of the Calibration Event record, (b) within each Measurement Group level, and/or (c) to specific Nominals in a Measurement Group.
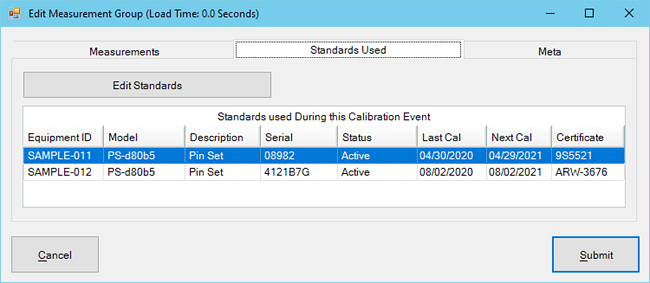
View the Standards Used tab of the dialog to see a list of the Calibration Standards used for measurements in the current Measurement Group (MG). To link Standard Equipment in the MG, click on the [Edit Standards] button to bring up a list of available Standards to choose from and checkmark the Standards used in this measurement group.
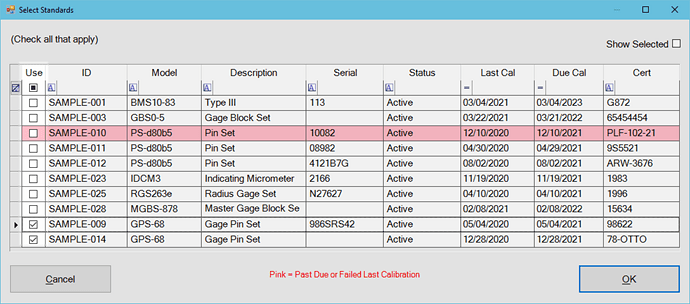
The list of selectable Standards records are Equipment already identified as a Calibration Standard, have a Calibration Due date greater than the current day, AND are with its most recent (if any) Calibration Event as 'Passing'. Standards that still need calibration are shown in red, but cannot be selected. After checkmarking the correct Standard(s) used, click OK to submit and save them as a snapshot for historical traceability tied to this Calibration Event.
NEW Option: Watch a video demonstrating how to enable an alert about Missing Calibration Standards upon submission. Manage these settings in Calibration Options and checkmark where Standards should be required, (e.g., at Calibration Event, Measurement Group, or Measurement Nominal)
Additional Tabs in the Edit Calibration Event Dialog
There are three last tabs in the Edit Calibration dialog that help organize and display information related to the current Calibration Event.
- Custom Fields: Custom fields are available for adding Characters, Dates, Numbers, and Check boxes. Visit the Change Field Names help topic to learn how to edit these fields.
- Scatter Plot: This tab displays a Scatter Plot of the measurements entered for a given Measurement Group. In-Tolerance As Found measurements are displayed Green while Out-of-Tolerance measurements are Red.
- Meta: This is a READ-ONLY information tab used as a reference to view which user created the record and which user was the last to edit it, including the dates and times these occurred.

